
The Goal
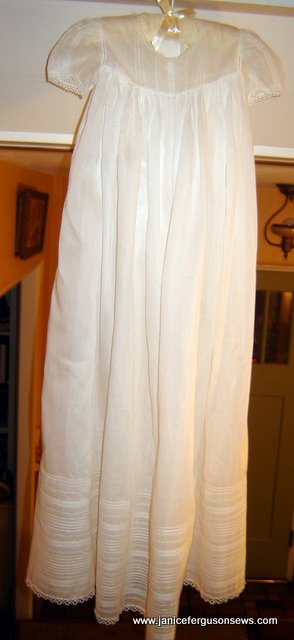
When I began this project I had a 3-fold goal. It was to make a gender neutral christening gown
- using less than 200 yds. of lace
- costing less than major household appliance and
- looking more like an heirloom than a Halloween costume.
The purist in me demanded that all materials be heirloom quality and that the design be suitable for the solemn and yet joyful occasion for which it was intended. Upon completion, I felt that my goals had been met.
The Materials
The materials were simple and few: ultra sheer Swiss batiste, also known as finella or Swiss muslin, 5 yds. lace tape, 1 ¼ yds. entredeux, 2 1/4 yds. 1/2″ tatting, 1 yd. baby tatting. With a 100 wing needle, 1.8/70 twin needle, 80 wt. cotton heirloom thread and 50 wt. silk thread, all supplies were assembled and ready to go.
Lace tape is a fabulous product that I developed many years ago and marketed for heirloom sewing. Wendy Schoen now owns that business, but I am now no less enthralled with the product than I was at its introduction to the heirloom sewing public. Approximately 3/8″ wide, it is 100% cotton and has a pull thread on either side, just like French laces. It can be used in place of lace and, since it comes in more than 20 colors, can add a touch of color when desired.
Mildred Turner’s third book, Mimi’s Machine Magic, has a section dedicated to creative uses of lace tape. If you are not familiar with her books, I would advise you to do your best to lay hands on a copy of each of the three. There are more techniques, more patterns and more inspiration than you could ever imagine. Long out of print, used copies can sometimes be purchased on eBay or on the SewItsForSale@yahoogroups.com list.
The Design Elements
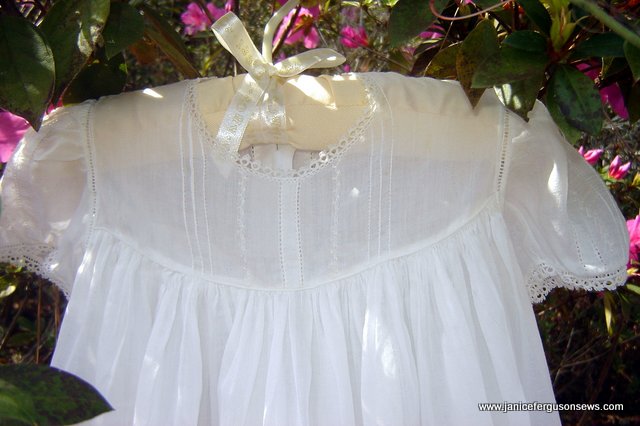
A simple basic yoke pattern was modified only slightly, by removing much of the fullness from the puff sleeve. This, I thought, made it more tailored for a baby boy and yet still suitable for a baby girl.
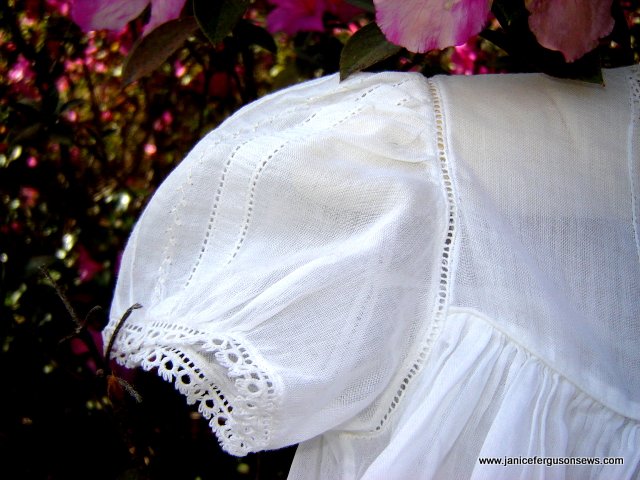
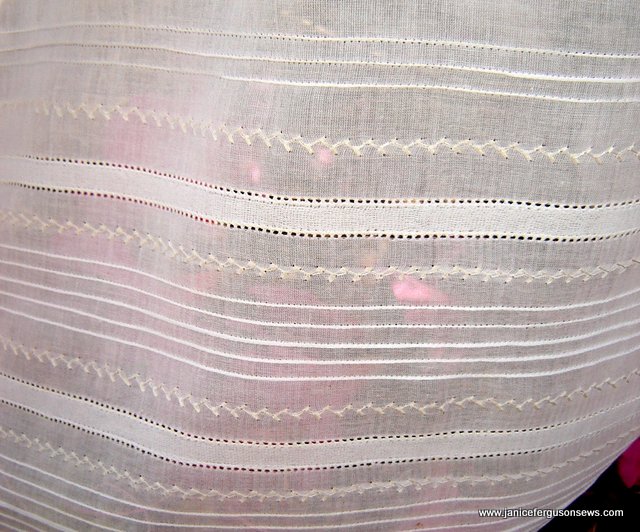
Design elements consisted of tiny twin needle pintucks, shadowed lace tape, hemstitching and a vine decorative stitch. The repetition of these elements throughout the gown on the yoke, sleeves and fancyband helps to generate a pervasive, understated elegance.
The Techniques
Here, the lace tape is stitched to the underside of the batiste and shadows through like a stripe. (This same technique is used with yellow lace tape on the earlier post, Lace Tape Doll Dress.)  It can just as easily be applied to the top side of fabric, but for this gown, I felt the difference in texture was a distraction.
 NOTE: See my tutorial Pinstitch~~What’s it all About? here. Follow up with part 2 of that same tutorial Pin Stitch~~Part II here.
After the lace tape was stitched in place with 80/2 white thread, a pinstitch was worked on either side. That required the largest expenditure of time.
When teaching beginning heirloom sewing, I often told students that heirloom sewing is very costly, either in materials or time or both. But few techniques give as much return on your investment of time or money as does hemstitching.
The Hemstitching Topic
One of the most common questions I get when teaching heirloom sewing is just what is the difference between hemstitch, pin stitch and entredeux stitch. NOTE: See tutorial Constumer-made Entredeux which explains the differences.
On the outside chance that some of this blog’s readers have that same question, I quote from Carol Ahles exceptionally authoritative and useful book, Fine Machine Sewing. Stitch illustrations are from Mildred’s Mimi’s Machine Magic  book, mentioned above.
Carol says “Hemstitching by hand entails withdrawing threads from the fabric and bundling the remaining parallel threads with a needle and thread to form an open design. It is often used as a decorative finish at a hem. Although it is possible to copy this look using the machine by first withdrawing threads by hand, then machine stitching the sides of the area, in fact machine hemstitching has a much broader meaning. The term “hemstitching on the sewing machine” applies to any of the following looks:
*the hand pin stitch (point de Paris), as used to attach lace, to hem and for Madeira applique’.

*hemstitching as produced on hemstitching machines from the 1920’s and 1930’s;

entredeux stitch, diagram and actual look
*entredeux, a ladder-looking trim used in heirloom sewing to attach laces, fabrics and embroideries;
*other stitching in which the open look or “holes” are the main decorative focus….” Fine Machine Sewing, p. 77-78
On the pictured christening gown, almost all of the hemstitching is a machine made pin stitch, which is created by a forward/backward 2 or 3x repeat of a single length straight stitch, followed by a right angle stitch which reaches into the lace or hem or whatever is being connected to the line of holes. It looks much an applique’ stitch on the machine menu but the applique stitch usually has two straight stitches between the “reach” stitch . It differs in that there is just one stitch length between the reach.
The only other hemstitch used on this gown is the entredeux stitch worked at the neckline. Unlike the pin stitch, the entredeux stitch has finished edges and the fabric on which is created can be trimmed right up to the edge of the stitches. Lace, or in this case, tatting can be butted against the trimmed edge of the entredeux and joined with a tiny zig zag stitch that reaches from the trim into a hole of the entredeux.
All hemstitching looks best when worked with wing or large needle (size 90 to 120) and fine cotton heirloom thread, such as 80/2 Madeira Cotona. The large needle creates the original hole and the fine thread holds the hole open. Due to the number of repeats in the stitch, a heavier thread would fill the very hole the needle had just created.
Commercially made entredeux was used between sleeves to the bodice and between the tatting and the edge of the sleeves. A pinstitch would have worked well if lace were used as the trim. But tatting, most especially baby tatting, is easily cut by a wing needle, so the commercial entredeux was used.
At the hem, a larger tatted trim was used. This, my favorite, can be joined by a pin stitch rather safely if care is taken to watch for the occasional collision of wing needle and tatted loop. So at the hemline, the tatting is joined with a pinstitch, saving the expense of 2+ yards of entredeux.
The Lessons
Christening gowns need not cost a fortune.
When working with a tight budget, substitute time costly techniques for expensive trims rather than using inferior quality fabric and trims.
Lace tape is a great product.
Both Mildred Turner and Carol Ahles’ books should be on the sewing room book shelf of beginning and serious students of heirloom sewing.

14 responses to “Lace Tape Christening Gown”