
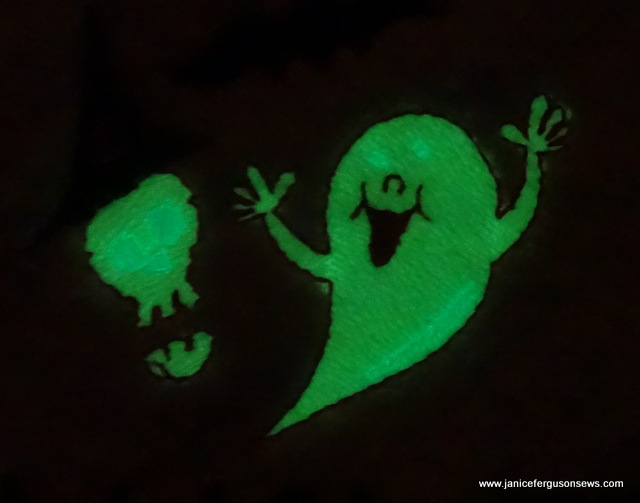
Check the UPDATE below. The ghost and skull glow in the dark. Happy Halloween towel V.2 below is a great improvement.
NEWS FLASH–Urban Threads is running a sale on their designs especially designed for glow-in-the-dark threads–$1.29 each with a neat bonus set that comes with a purchase of $10 or more.
That’s just 8 designs. I finished these towels just about an hour before I found out about this sale. I had spent a lot of time searching my design library for files that would be suitable for glow-in-the-dark. Oh well. Children are crazy about this stuff. I look forward to stitching my new designs for the older grands.
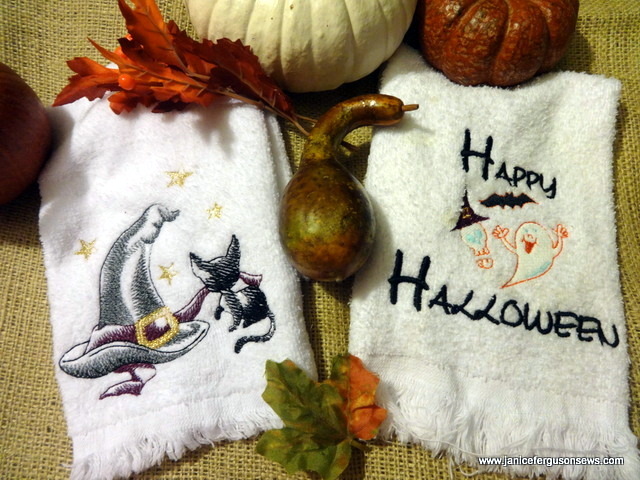
A package of fun Halloween items will go out in tomorrow’s mail to my two younger grandchildren. A fingertip towel for each child should make them smile. When the children were here a few weeks ago, they were so pleased to have embroidered personalized towels for their bathrooms.
Three year old Vivian Rose is infatuated with cats so the cat and hat towel is for her. Seven year old Alastair was equally infatuated with glow-in-the-dark threads when he discovered them during that same visit. So that is the fun factor on his towel.
It looks pretty ho-hum until the lights are out.
Be sure to check the UPDATE below if you haven’t already.
LESSON LEARNED: When dealing with glow-in-the-dark, areas outside the glow are best stitched in regular colored thread. The ghost mouth and nose were stitched with orange thread. That looks good. I mistakenly thought that having the ghost and skull eyes glow in a different color would give a great effect. Wrong. It would have been so much nicer with the lights on or off if I had used black or orange thread for those features. Live and learn.
UPDATE: After this post was written, I couldn’t live with the Happy Halloween towel. I knew the fix would be easy. So the towel was rehooped and the scan feature on my Dream Machine was engaged. After the embroidered towel was scanned, the original design was opened. As it appeared on the screen, I dragged it over the existing design with the stylus.
After scrolling through the first few colors, I came to the skull eyes and then the ghost nose. They were re-embroidered with black thread.

The fix took less than 3 minutes and towel looks much better in daylight— even better in the dark.
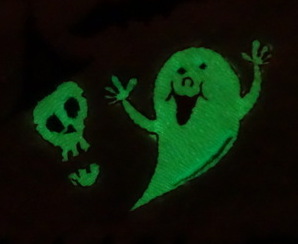
Restitching those elements of the design in black was a huge improvement.
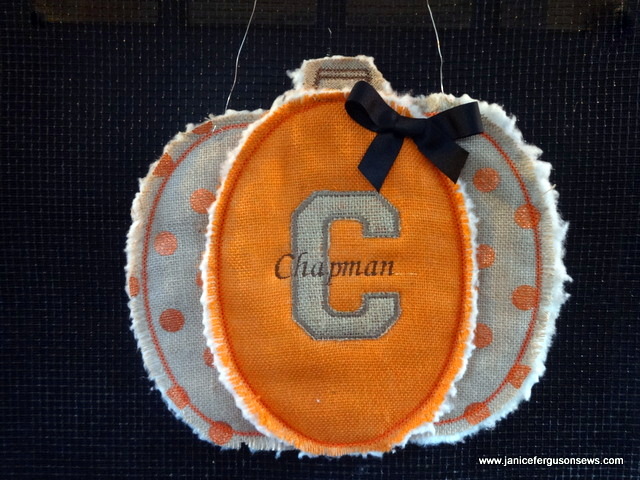
Even more was learned on the next project, a pumpkin door hanger.
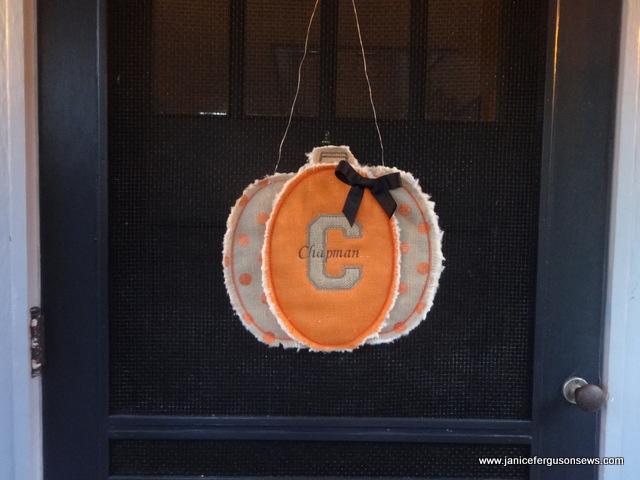
What a fun project! Pumpkin Door Hanger from Hang To Dry. The applique’ font and the text were from Brother’s PE-NEXT editing program.
In spite of unexpected challenges, I really enjoyed this little project. My stash includes a variety of burlap fabrics, the design was purchased at least a year ago, and I always have cotton batting on hand. So even though it was after dinner when I decided to begin this, I was ready to go.My daughter always decorates extensively for each holiday, so knew she would like this.
The pumpkin door hanger goes together quite nicely and comes in several sizes. I chose the largest size, 7 x 11″. Fortunately, I used the 9 x 14.5″ frame on my Brother Dream Machine. I learned some time ago that using a larger frame than necessary gives some wiggle room for placement.
How could I know then just how important that would be as I faced the challenges? These challenges, I am sure, were a result of my misunderstanding the directions, not the fault of the design.
From this point in the post, the text is pretty boring unless you are interested in problem solving. If so, just check out the close up of the door hanger and know that I appreciate your stopping by. Bye-bye!
For those willing to suffer vicariously with me or would like to see how these challenges were tackled, read on.
The pumpkin door hanger requires 3 hoopings. No problem. The first hooping creates the polka dot crescents for the left side.
Only stabilizer is hooped. A die line is stitched showing the shape of the left crescent. A 3-layer “quilt sandwich” of polka dot burlap, batting, and polka dot burlap was placed over the die line and sewn to stabilizer. Because the pumpkin may be viewed from both sides on a screen door, the same fabric is used for front and back. Also the bobbin thread color was the same as the needle thread, again so the back would look nice.
After the first design file was completed with decorative stitching, the piece was removed from the frame and stabilizer was torn away. The crescent shape was trimmed, according to the instructions, “within 1/2″. Hmmmmmmmm……So the crescent shape was trimmed to 3/8”.
These steps were repeated for the second hooping which created the right crescent.
The applique C and text had been added to the end of the third file, the center of the pumpkin.
The design file for the third hooping first stitches a die line to which the inside curve of the left crescent is to be lined up. Lined up how? Aligning the cut edge made sense to me because the orange center section obviously overlaps. And how could I line up the decorative stitching line of the crescent over the die line? The die line was covered by the crescent with its 3/8″ trimmed edge. So I went with the cut edge.
After both side crescents were stitched to the stabilizer with just a few threads being caught in the stitches, the die line for the pumpkin stem was stitched. I thought I must have trimmed too close to the crescent. Then the plain burlap quilt sandwich was applique’d in place.
Moving on….the center die line was stitched. I noticed that it did not cover the raw edges of the crescents. Hmmmm. #2…..
At that point I should have examined the design on the computer. Then I would have realized that the decorative stitching of the center section was to be stitched directly on top of the decorative stitching on the crescents.The crescent die line was not for the raw edge, but for the decorative stitching line.
But I plowed on, in a hurry as always, assuming that the decorative stitching would catch the crescents.
It didn’t take long for me to realize that this wasn’t going to happen. But did I remove crescents, discard the stabilizer with the finished stem, rehoop stabilizer and carry on? No. Why? I don’t know. But I knew I had to fix it or the three pieces would not be joined together.
Instead, I went back to the third hooping design on the computer (FINALLY). I extracted the area for the center orange section minus the stem, took it into Brother PE-NEXT editing program and enlarged it until it covered the raw edges.
Again using the scan feature on my Brother Dream Machine, I dragged the new design in place. It looked good but…uh oh. What about the stem? Ooops, forgot all about that. The oval only needed widening, not proportional lengthening. Now the stem would be no more than a tiny bit of stump.
After moving the design up to add length to the stump, which fortunately had not yet been trimmed, the decorative stitching was worked on the new section of stump, giving it an extra row of decorative stitching. Then, the design was moved down again to cover the crescents.
All this took a LOT longer than it would have taken to start over with the third hooping.
After the embroidery was complete, burlap threads were removed or trimmed where they were likely to fray out and look messy.
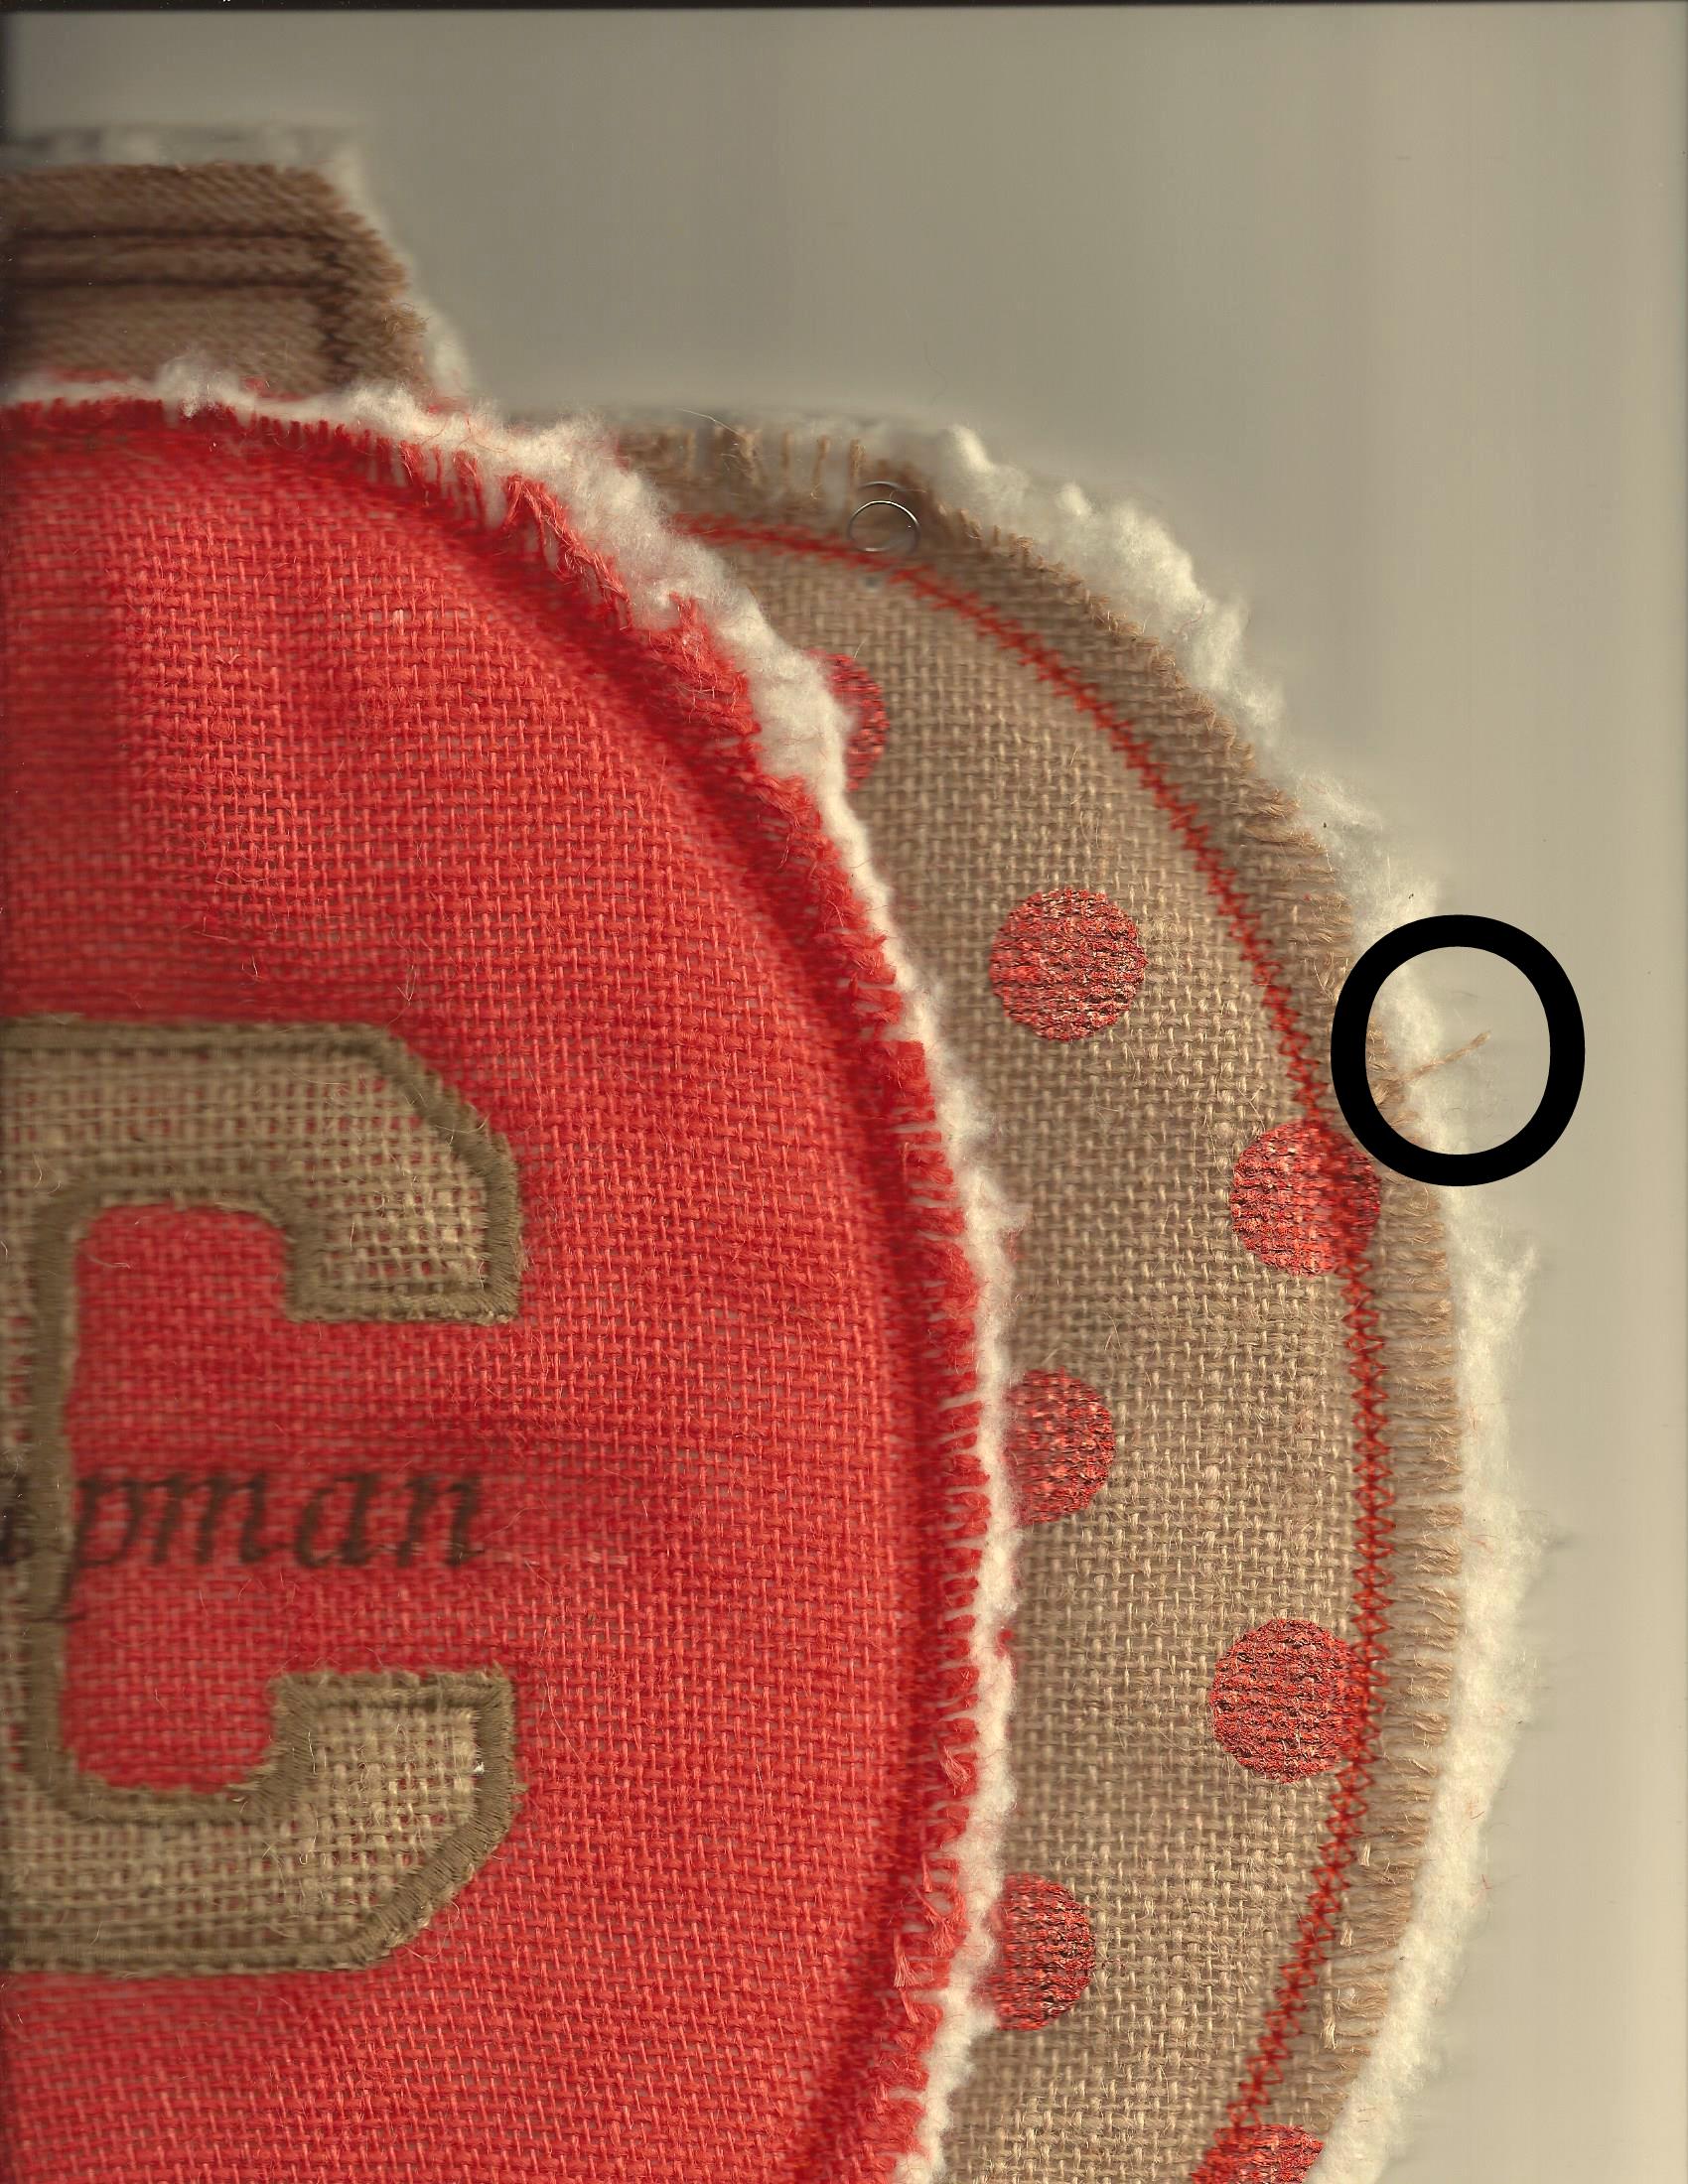
Before this was scanned, I had already removed most of the loose burlap threads. You can see that all vertical threads not caught in the decorative stitching have been removed or trimmed. Only the tidy horizontal threads remain. One missed thread is circled.
Tweezers were used to pinch and pull the edges of the batting. I like that stressed look better than the clean cut batting against the raveling burlap. A black bow was pinned to the pumpkin and finally it was done. Many lessons were learned.
MORE LESSONS LEARNED
- Study the design before stitching to make sure you understand the sequence and details.
- Start over if it looks like there is little to be lost and much to be gained.
- Use a larger frame than necessary if there is any chance you will need to move the design in the frame.
I’m getting these things packaged up to be mailed out tomorrow. I have to admit that I am curious as to whether anyone read through this long, painful saga. Please let me know if you did and if you prefer less detail.

5 responses to “Fun Halloween Projects and Lessons Learned”