
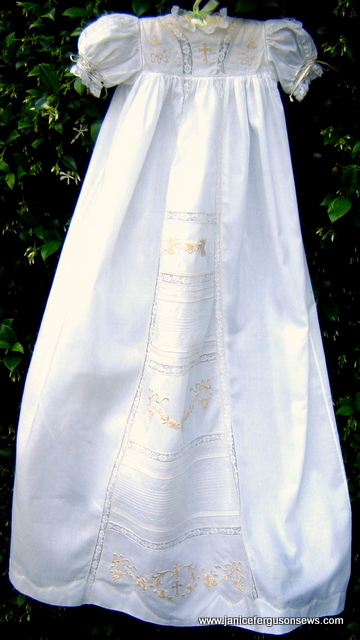
This christening gown was the main project for the Babylock school I taught at Martha Pullen’s school in Huntsville, AL, a few years ago.
The ecru and white combination has always seemed the height of elegance to me. Also, since photos had to be posted on the school web site, the ecru embroidery showed up much better than if the embroidery had been white on white.
It seems to me that anytime Swiss batiste, imported trims and heirloom sewing techniques are combined, the result is likely to be something beautiful. In this case, the classic christening gown is a melange of Swiss batiste, French lace and entredeux.
Elaborately embellished, it includes classic details such as point de Paris, Madeira appliqué, shaped French Val lace, feather stitching, pin tucks, twin needle shadow work, and delicate embroidery. Also incorporated into the gown’s design is Lace Tape, a recently rediscovered heirloom trim, applied as a shadow appliqué on the wrong side of the batiste.
But the list of goods is relatively modest for a christening dress, a total of 12 ¼ yds. of French lace edging, insertion and beading, 4 yds. entredeux, and 3 ½ yds. Swiss batiste.
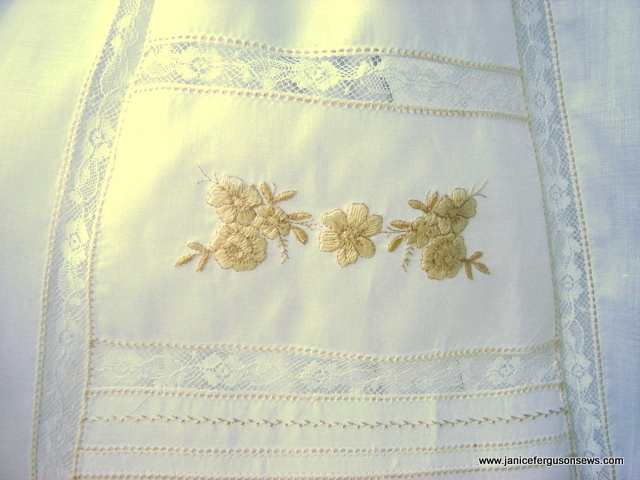
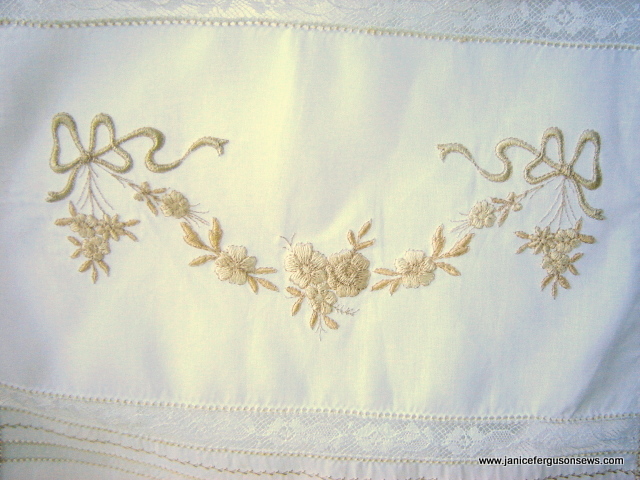
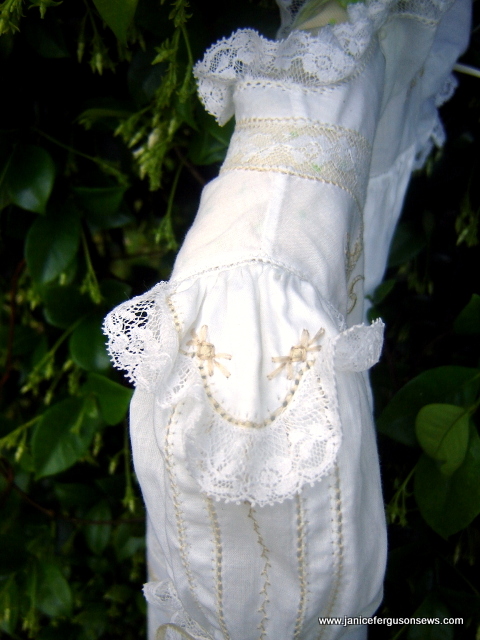
The details that hold the most interest for me are in the embroidery, continuous bodice lace insertion, sleeves, shadowed lace tape and Madeira appliqué hemline. A few readers have inquired about the Madeira appliqué technique, so I have included that information at the end of this post.
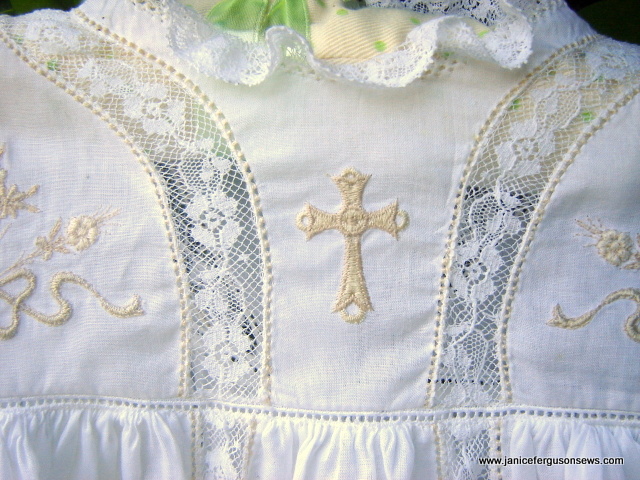
EMBROIDERY
The embroidery does the heavy work on this heirloom, though the multitudinous tucks help carry the load. The designs are from Babylock’s Borders 1 disk and Small Polo Shirts card #20 (cross only). They were combined, recolored and resized using Palette and Designer’s Gallery Sizeworks. The tiny flowers on the sleeves are from Fil Tire’ and Fancywork Elements, by Suzanne Sawko and me.
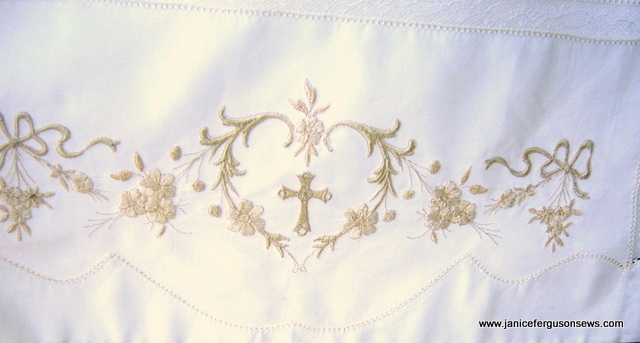
For reasons unknown to me, the digitizer of this collection chose to have each segment of the design stitched completely before moving on to the next. Six colors and 34 color changes were required for the design on the bottom of the front panel, before the addition of the cross from the card #20.
With careful color sorting and the addition of the cross, the design had 6 colors and 9 color changes. That was a significant savings of time. Each area of embroidery was similarly color sorted for a proportional reduction of thread changes.
Learning to use the color sort function on your embroidery software will be well worth the time spent. As I do more and more editing, I find it not only useful but often necessary.
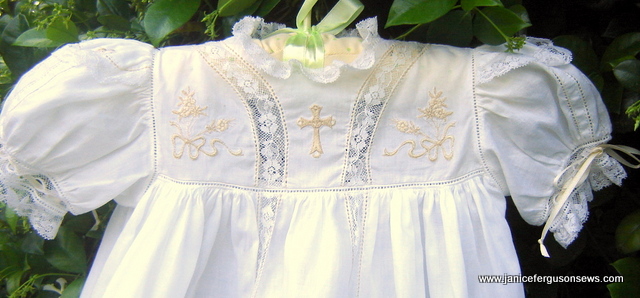
CONTINUOUS BODICE LACE INSERTION
On the first several heirloom dresses I made for my daughter, I tried to match up lace insertion at the shoulder. It seemed that I always had to fudge one direction or another to get them to match up. Then the lace had that distracting seam.
Since then, I have traced the bodice patterns onto the fabric, including the lace placement lines, and then cut out the pieces with at least one inch extra around the entire perimeter. The front and back bodices seamed at the shoulder and the neckline and armscyes are straight stitched to prevent stretching.
Because the back yoke shoulder seam lines are usually slightly longer than the front and meant to be eased in to match, rarely do the lace placement lines match: thus, the cause of my out-of-alignment lace insertion.
But if the lines are matched up after the seaming/easing in process is complete, then the lace insertion lines can be drawn to lie smoothly over the shoulders. By adding the lace at this time, rather than prior to seaming, the insertion is continuous and smooth.
SLEEVES
A three scallop cap has been applied to the top of the sleeve, using the Madeira appliqué technique detailed at the end of this post. After being stitched with washaway thread and pressed flat, the scalloped appliqué piece was attached to the cap of the sleeve with a pin stitch.
The portion of the sleeve cap covered by this appliqué was cut away, after which the tiny flowers were machine embroidered at the peak of each scallop. Finally, gathered lace edging was zig zagged in place, treating the pin stitch holes as if they were entredeux.
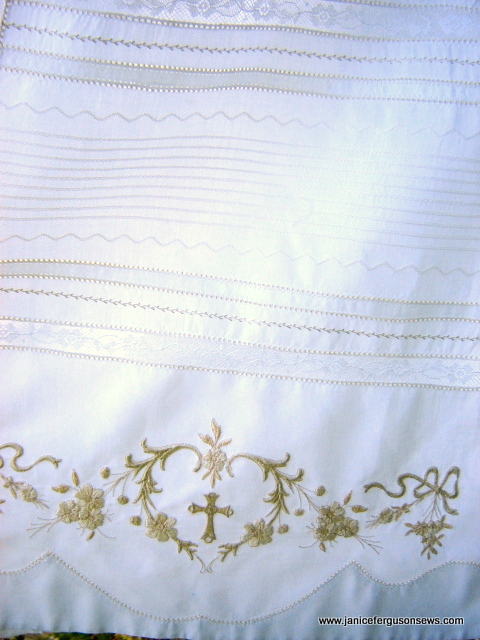
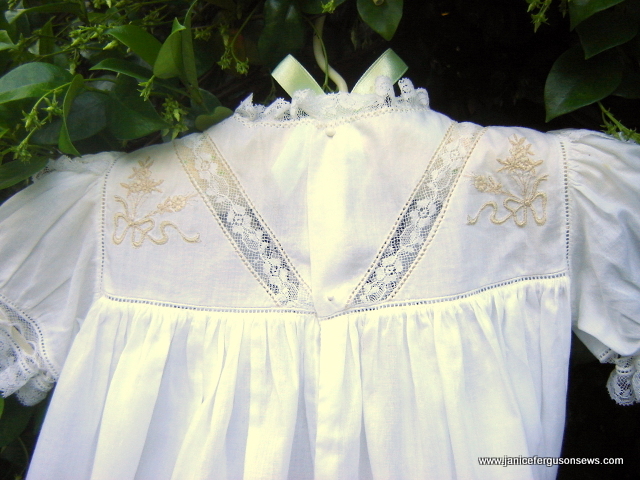
SHADOWED LACE TAPE
Lace tape is a fabulous 100% cotton product that can be shaped with a pull thread on either side, just like heirloom insertions. It comes in 23 colors, making it a unique heirloom trim. When applied to the underside of sheer fabric, it shadows through, just like traditional shadow appliqué.
For this gown, ecru lace tape was used with no shaping. It gives an ecru shadow, made more noticeable by the ecru thread used for to pin stitch it in place. The lace tape is used on each of the fancy bands in the front skirt panel as well as on the sleeves.
The shadow effect is barely visible in the photos. In real life, they are subtle but noticeable.
MADEIRA APPLIQUÉ TECHNIQUE
The design must have center axis, with the design mirror imaged on either side of line, such as hem, collar, etc. The center axis/line becomes a fold in the fabric.
- 1. Starch and press fabric.
- 2. Trace one half of design from center fold to outer edge, with Dixon washout pencil. This is more like a colored pencil than the more common blue Dritz marker. Because the piece is later spritzed with water and then pressed dry, the Dritz type marker lines would be dissolved and then pressed into the fabric, perhaps never to be removed. The Dixon markers require a little soap for removal, but it washes out easily.
- 3. Stitch exactly on drawn line with water soluble thread in needle and bobbin thread in bobbin. Pivot frequently.
- 4. REMOVE WASHAWAY THREAD FROM SEWING MACHINE.
- 5. Press, applying iron to side with Dixon washout pencil. DO NOT ALLOW IRON TO TOUCH WASHAWAY THREAD. It will melt.
- 6. Trim excess fabric away to scant 1/4″ allowance. Clip curves and notch points.
- 7. Gently turn seam allowance to inside, pressing points out sharp and crisp with point turner. Press dry.
- 8. Gently spray with water and press again. PRESS UNTIL COMPLETELY, ABSOLUTELY DRY.
- 9. Gently pull seam open. The appliqué piece should open easily. If not, carefully clip a thread or two OR spray with water again. Take care not to expose previously exposed/opened seam to spray.
- 10. The resulting piece is a perfectly turned edge in the shape of the drawn pattern. Apply it to garment in manner indicated by type of placement. i.e. For a hem, put right side of appliqué piece to wrong side of skirt. Straight stitch to skirt. Press seam flat. Then flip to right side of skirt , press seam flat again and baste scalloped edge to skirt, 1/4″ inside of scallop. Make final attachment with pin stitch, feather stitch or tiny zig zag.
Of course, all these techniques can be used alone or in combination on other garments. I particularly like the fancyband arrangement, which makes a dramatically elegant statement while using a minimal amount of expensive goods.If any of these techniques are new to you, I encourage you to try one or two. It took me years to learn these tidbits, but the time was well spent.
I do have a few regrets, things I would change if I had a do-over.
- 1. Since all the hemstitching was done in ecru, I wish I had used ecru entredeux.
- 2. Even after fiddling and fiddling with the lace insertion on the skirt, I was never able to line it up perfectly with the insertion on the bodice. The bodice lace stretched, making it wider that the skirt lace. It would have been much easier and more effective to have run a gathering thread across the bottom of the bodice and then pull that lace back in place. Why didn’t I think of that then?
- 3. The embroidery on the back bodice should have been nestled deeper into the corners.
- 4. The Madeira applique’ hem would have been more proportional if it had been wider.
That’s what I will do next time.

3 responses to “Babylock Christening Gown”